Showing posts with label repurposed material. Show all posts

ONLY BEGOTTEN SON


For God so loved the world, that He gave his only begotten Son, that whosoever believes in Him shall not perish, but have eternal life.   –John 3:16

We spent a lot of time deliberating over which name of God to paint on this antique sled. Originally, the entire sled was faded wood, but we could see a hint of white on the center board and the barest hint of red on the sides. I applied a light stain to bring back the colors, and then hand-painted the name.


LION OF THE TRIBE OF JUDAH


Then one of the elders said to me, "Do not weep! See, the Lion of the tribe of Judah, the Root of David, has triumphed. He is able to open the scroll and its seven seals."   –Revelation 5:5


  • A generous soul donated the metal, remnant from some unknown vehicle, building, tool or structure
  • My nephew Levi hammered the frayed edges flat with a rubber mallet and a good dose of insanity (picture floppy blond hair flying, mad glint in the eye, crazy cackling and flailing hammer)
  • Andy helped me use the vice grip and a pair of pliers to carefully fold the edges back to give it a semi-uniform and semi-safe edge
  • Fritz donated his mother's cast-iron trivets, which we spray-painted silver and added as embellishments
  • Wendy used a series of improvised tools to pierce holes in the metal and insert the feet of the trivets to attach the embellishments (picture more floppy blond hair flying and flailing hammer, maybe a few mild epithets)
  • Sam and Lilli helped me hunt through a large shoebox full of vintage push-pin letters to find the right letters, in the right sizes
  • I spray-painted them silver and laid them out. I also lost the J, found and painted another one, and 3 days later found it on the bottom of my shoe
  • Wendy glued the letters in place
And that's all, folks!

EL SHADDAI


When Abram was ninety-nine years old, the Lord appeared to him and said, "I am God Almighty; walk before me faithfully and be blameless."   –Genesis 17:1


This beautiful sign is another example of Wendy's skills at painted letters. The old frame was rescued from a barn. Wendy cleaned it up and attached recycled canvas to the frame for the letters. The canvas was originally used for another elementary room project, but Wendy "antiqued" it by soaking it in a solution of strong tea. The final result has a vintage parchment tone and matches the look of the frame perfectly.

HELPER


So we say with confidence, "The Lord is my helper; I will not be afraid. What can mere mortals do to me?" –Hebrews 13:6


This beautiful antique washboard was a donated item, but I wanted to find a way to use it without destroying the piece. I fashioned the letters out of soldering wire. It's amazingly easy to work with, because it bends and smooths fluidly yet holds it shape well.

First, I printed the lettering in the desired font and size. I laid the printout on a scrap board, and hammered in nails at the key bends and wrap points of the letters.


This is how it looked after I placed the wire. You can see I used the nails just as guides–not necessarily as wrap points.

A quick spray-paint with Massey-Ferguson tractor red, and we have another name of God!


Of course, as Dave Ahlstedt (Wendy's husband) immediately pointed out, we could have just used red Twizzler candy and it would have been a lot faster.

TRANSFORMED


Just in case you're wondering, "Transformed" is not a sign.

Yesterday I was looking for a photo showing one of the pieces in its "raw" form, and I came across this amazing photo. It's amazing because when I took this photo, it looked like what it was—junk! Now the junk has been transformed into meaningful works of art with the potential to change the way people view God. 

ISN'T THAT AMAZING!!!  You don't have to be a literature major to see the beautiful metaphor for our lives. No matter how humble our beginnings, what we've been through, or how the rest of the world sees us, God will always regard us as precious. He will always see what we can become. If we let him transform us, we also have the potential to change the way people view God.

-----

Do not conform to the pattern of this world, but be transformed by the renewing of your mind. Then you will be able to test and approve what God’s will is—his good, pleasing and perfect will.
–Romans 12:2

DOOR

So Jesus said to them again, "Truly, truly, I say to you, I am the door of the sheep."   –John 10:7 (NASB)

If you would like to know how we achieved the beautiful, vintage, cracked-paint finish, I can tell you. We did nothing. This vintage door is as authentic and true as it appears.

My Mom faithfully removed this closet door from a farmhouse on our second salvage trip, using a screwdriver we found in a heap one room over and stopping periodically to warm her hands. After we removed the door, I stepped into the closet and looked up to see blue sky through a large hole in the roof. We propped a sheet of plywood in its' place and anchored the plywood with several layers of tools and heavy items.


The Door sign sparked a round of lively conversations with my kids (not that sparks are needed for lively conversations with ages 6, 8 and 9). They wanted to know why Jesus called himself a door. It turned into a great teaching moment and gave me so much hope for the scope of this project. Realizing how kids retain and understand word pictures—so much better than mere printed words on paper—inspired me to see this project as more than a room makeover. It is my hope and prayer our efforts changed not just the walls, but also changed hearts.

CHRIST


Jesus Christ is the same yesterday and today and forever.   –Hebrews 13:8

Some signs were planned from the very beginning of the project, and some signs were improvised on a whim. We found this vintage glass piece and thought it may have been a part of a light fixture. It was definitely interesting enough we wanted to include it, even if it meant adapting our plans or adding a new sign.

In this case, we couldn't leave out CHRIST.

This was my first experience transferring waxed-paper printouts to glass. You visit my Dayspring post for a list of tips based on what I learned during this project.

Here's my beautiful Hovawart dog Dahlia, posing happily next to a sign. She's happy because Wendy's sons Carter and Caleb were her die-hard frisbee-throwing buddies during spring break!

HOLY SPIRIT


But the Advocate, the Holy Spirit, whom the Father will send in my name, will teach you all things and will remind you of everything I have said to you.  –John 14:26


I embroidered 'Holy Spirit' on a screen door, using crochet yarn (that's something I don't say every day). I truly enjoyed making this sign, both because I like to embroider–but who really uses embroidered doilies or napkins–and because it was the only sign I could make while watching TV and relaxing with my family.


To make the sign, I first propped the screen door on the basement deep-freeze and took a photo.
This is, of course after I took a shower with it (another thing you don't say every day) to remove the dirt, grime, mud dauber nests and clumps of cobwebs.


I cropped the photo in Photoshop, added a text layer, and started experimenting with fonts and colors. This one received the final vote.  

After I chose a font, I switched to Illustrator and set my artboard dimensions to match the size of the sign. With the artboard at actual dimensions, I lay out the text and size it to fit the sign. Fortunately, these letters fit on an 8.5" x 11" piece of paper and didn't require me to piece them together after printing.

I taped the printed letters on the back side of the screen door, which might have been easy if the screen hadn't been so warped and bendy. It was challenging to find a straight line. It's also not easy to stick the letters on straight from the front (my arms aren't that long). With the letters in place, I traced the outlines with colored chalk and removed the annoying paper. 


I propped the door in a corner of the living room and worked on it off and on for about two months. The finished result is one of the more colorful signs in the room!

WORD

In the beginning was the Word, and the Word was with God, and the Word was God.
–John 1:1


We found an example of this paper-roll idea on Pinterest, and loved the concept for WORD.
Angela faithfully crafted the paper rolls out of pages from old hymn books (thank you, Mary Kaufman) until we had a large amount of the paper tubes. We weren't certain we were going to have enough, so she even solicited a donation from the local library. On close examination, you may see advice on disease prevention mixed in with the hymns.


We handed her a stack of old hymnals, pointed her towards the picture on Pinterest, and I made some more airy hand-waving gestures and provided vague directions involving Elmer's glue, rubber bands, the need for solid rolls, trailing off...

It's a good thing Angela likes being crafty and was able to figure out how to make these. She discovered better directions on a website and used a hot glue gun to make the paper rolls. The end result was four grocery bags nearly full of nice tight tubes of paper.

Meanwhile, Wendy and I prepared a large board to use for the sign. When the paper tubes were ready, I started chalking in the letter outlines. W-O-R...and then I ran out of room. Either the board wasn't long enough or the letters were too large.

Wendy and I had another one of our Highly Professional Work Conferences, wherein we make a lot of sarcastic and semi-insulting remarks and laugh and range off-topic and finally remember the point and hem and haw and Wendy usually says, "well, it's up to you," and I say, "hmm, what do you think?" and then we typically (99.99 percent of the time) land on the decision that means more work but we think will look better.

That means we made a new board so we could have the larger letters. The end result is over eight feet wide and made the most of those beautiful paper rolls.


For those of you interested in assembly, here are the steps:

Wendy cut the boards and fastened vertical braces on the back to form the sign. I painted the entire sign a solid coat of serious gray. Seriously, it's Sherwin Williams Serious Gray (We seriously made a lot of serious jokes while we seriously painted serious sign boards Serious Gray.)

After the gray dried (seriously), I dry brushed on a few random strokes of pink. Then I hit the whole surface with the orbital sander. To age the surface to complement the vintage hymn pages, I brushed on and rubbed off a layer of dark stain.

The paper tubes were the width of the hymnal, so we planned to use a scroll saw to cut them to the proper width. After a slight workplace hazard involving saw blades pinging around the room, we abandoned the saw and used branch clippers.  Because we enjoy making things much harder than they need to be.

I chalked the letters onto the board to provide a guide, then we laid out the paper rolls and chopped them as needed.

Then Angela and Wendy were incredibly patient while I had a short OCD moment to check the baseline, the caps height, the kerning and the leading. Thanks for that nerd moment.

Finally, Angela had another long interlude with E6000 to attach all the paper rolls. The end result is beautiful, and is a testament to my sister-in-law's patience and devotion.

CREATOR


This is what God the Lord says—
the Creator of the heavens, who stretches them out,
    who spreads out the earth with all that springs from it,
    who gives breath to its people,
    and life to those who walk on it.  –Isaiah 42:5


Sometimes the plan for a sign started out very clear and detailed, and sometimes the plan was a vague, hand-waving, let's-do-something-with-that-cool-metal-curvy-thing.

We decided to put Creator on this interesting blue scroll-like piece of iron. On a separate salvage trip, we think we identified the metal piece as a decorative insert in an iron column for a front porch.


We made this sign using purchased wooden letters, which my niece Lizzie aged by sanding and staining. The next step was to glue the wood letters to a thin strip of wood that served to connect the pieces and provide a wider point of contact for gluing the wooden letters to the metal bracket.

Unfortunately, the result was still a little stark and I wasn't completely satisfied. Because I'm the type of Mom who periodically used to tear up my childrens' crafts so I could assemble them "better", I was able to quash any guilt about gluing items over the surface of the letters.

My intent was to achieve a "layers of the earth" type of look with the different textures and colors. The layers are:
- white pebbles
- brown beach glass and brown and reddish stones with a few small seashells
- gray and green stones and glass
- preserved florist moss
- more tiny seashells
- beach glass in blue, white and pale green, mixed with a few blue and green tumbled glass pebbles.

AUTHOR & FINISHER


Looking unto Jesus the author and finisher of our faith; who for the joy that was set before him endured the cross, despising the shame, and is set down at the right hand of the throne of God.
–Hebrews 12:2 KJV


We used a vintage color and reverse-stenciling technique on this vintage metal sign. It originally arrived as a unique DX Motor Oil sign.


I didn't take any photos of the sign before we painted it, and it's now bolted to the wall so the backside isn't available, so I found this photo online. Our sign was much more battered and rusty.

My sister-in-law Angela cut out the letters on her Cricut. She glued the letters to the sign using Rubber Cement. I haven't used that glue in decades, and it smelled just like I remembered. You can still ball it up on your fingertips and make little glue boogies...but, I digress.

After she glued the letters to the sign, we applied a few coats of melon-colored acrylic paint. After the paint dried, Angela and my niece, Lizzie, peeled the letters carefully off the sign. It wasn't a perfect process, and we had to touch up the paint slightly after the letters were removed. 

A quick rub to remove the rubber cement, a spray of clear acrylic, and we have a beautiful vintage metal sign.

Here's a picture of Wendy diligently touching up the letters on the sign. I like that she keeps the bolt cutters close at hand. Just in case...


CORNERSTONE


Jesus is
 "The stone you builders rejected,
   which has become the cornerstone."

   –Acts 4:11

One of the ministers at the church generously donated loads of items from his mother, Mary, who had recently passed away. Mary had been a faithful Bible teacher and mentor to children at First Christian since the church was formed. She had a positive impact on many of the parents and young people at the church. People were profoundly moved and deeply touched to learn she had a role in the signs.

This perfectly square board was a find in her sewing room. We're not sure how she originally used it, but we had "square board" written on our list, and we found it!

Wendy painted the lettering on this simple but sweet sign, and I donated the stone—it was one of my treasures from coastal Maine.

AMEN


To the angel of the church in Laodicea write: These are the words of the Amen, the faithful and true witness, the ruler of God's creation.   –Revelation 3:14

This is the sign that almost wasn't. We had the perfect wooden sign board (which we think may have started its life as a chair back for a small school chair), the "A", the "M" (actually a "W"), the "E", and...
...no "N"!

We found a nice assortment of license plates, but they were heavy on numbers and light on letters.

Wendy sent out a plea on Facebook for an "N", with no luck.

Finally, the ultimate sacrifice. The week before Hanging Day, Wendy's Mom mailed her the license plate from her first car. So cute, she had a vanity plate with her name. We're so fortunate Wendy has an "N" in her name, and we're even more fortunate she was willing to take the tin snips to the license plate and donate the "N" to the project.

MESSIAH


Simon Peter answered, "You are the Messiah, the Son of the living God."   –Matthew 16:16


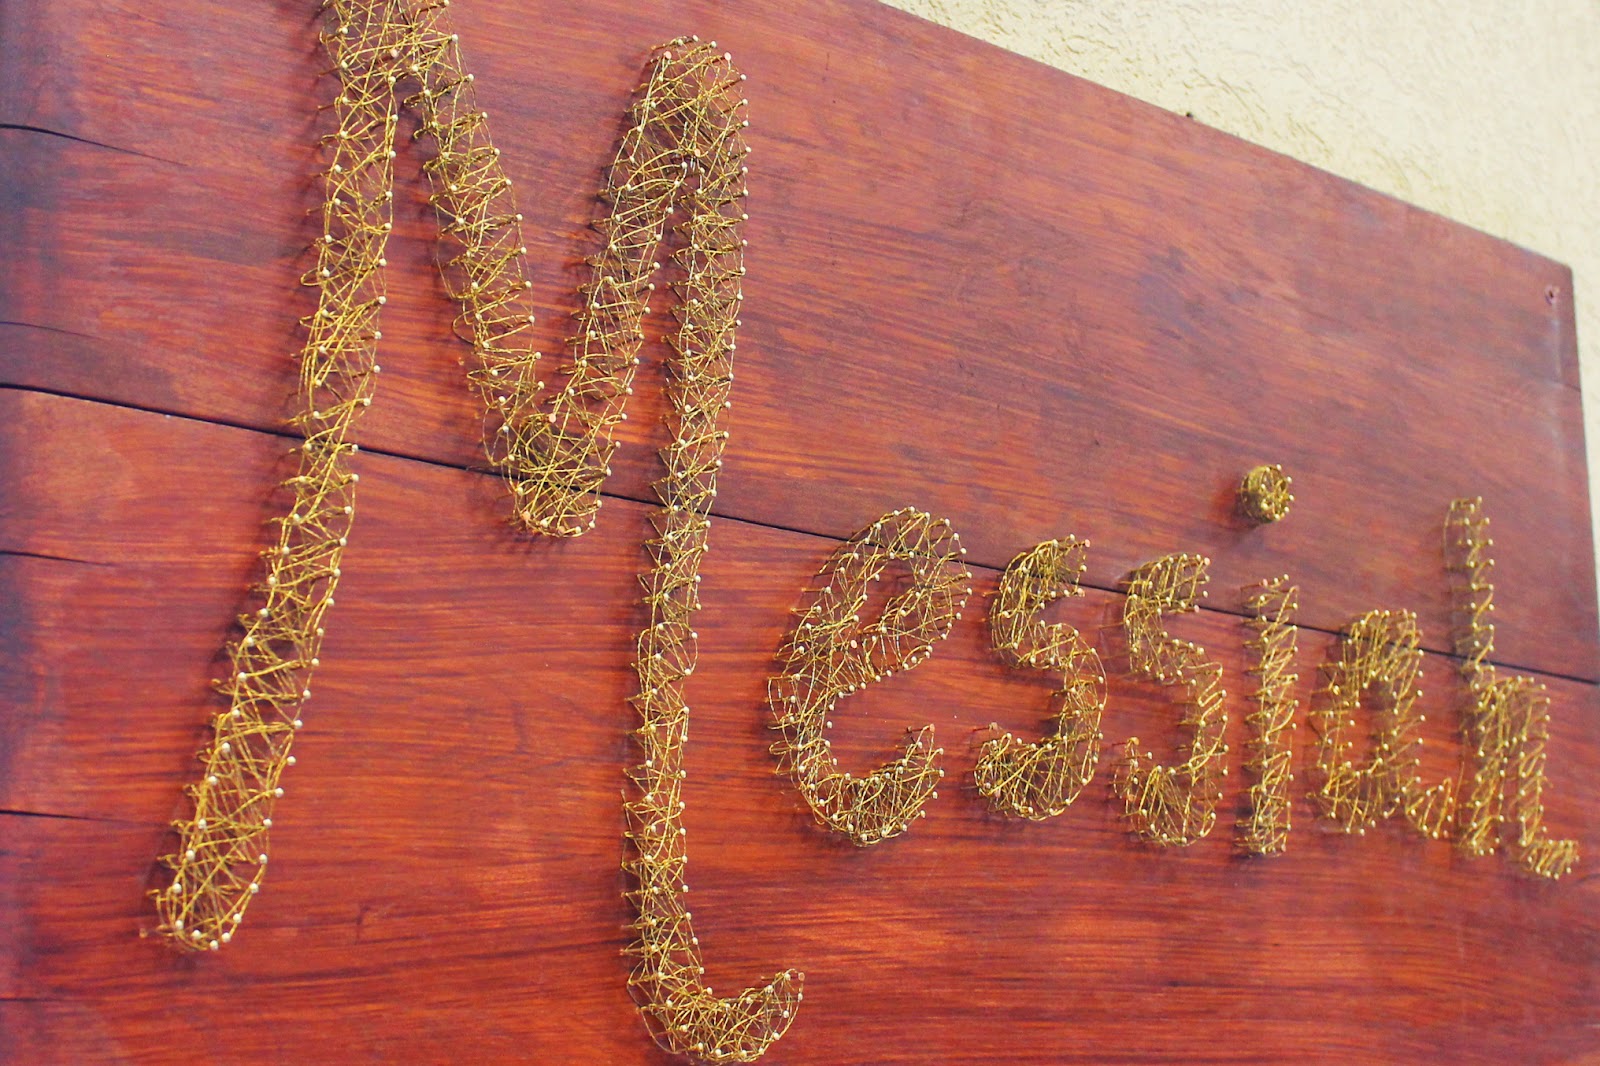
The beautiful name "Messiah" was listed early on in our plans as an "add if we have time" name. We had several names that we thought were notable and important that didn't make it on our initial lists due to time and materials.


Even after we called the project complete, I decided to make one more. How could we present the room on Easter Sunday without "Messiah"?

When Chewie offered this beautiful wire for the nail art letters on Good Shepherd, I tried several methods to make it work, but ended up using the jute twin for that sign. This beautiful brass wire was destined for another name.


The Steps:

  • Board prep. First I dug through the rubble that began as a sizable wood pile to find a few more boards. I came up with two table leaves, which weren't very appealing. I sanded most of the varnish off and then applied a heavy coat of mahogany stain, i.e., I dumped about a cup of stain onto the boards. Then I used a brush to streak the stain to give it a wood grain look, then let the whole mess dry.
  • Letters. This was more of the same, just using a different "string". I chalked letters onto the board, then wiped them off until they were barely visible. Then I nailed brass tacks to form the letter outlines. I followed a more consistent pattern when I strung the wire to give it a more uniform mesh appearance.

PRINCE OF PEACE


For unto us a child is born, unto us a son is given: and the government shall be upon his shoulder: and his name shall be called Wonderful, Counsellor, The Mighty God, The Everlasting Father, The Prince of Peace.  –Isaiah 9:6 (KJV)


Did I mention one of our team is a professional? Wendy paints and sells pallet signs. She's become very accomplished with hand-painting lettering, and after one or two of my own botched attempts, I turned the rest of the painted letters over to her. 

Here's a simplified version of the steps (excluding any mistakes and back-tracking):
1. Clean and repair windows and use a sander to add some texture and reveal the wood.
2. Apply a walnut stain and quickly remove it with a rag. The stain soaks into the exposed wood but adds only a light finish to the painted surfaces.
3. Paint the glass with chalkboard paint–once or twice will suffice.
4. Lightly dust/sand the chalkboard-painted glass to "age" it.
5. Paint the letters–two or three times.

Hah! If only it were that simple! We're clearly amateurs (at everything except painting the letters). In real chronological order, the steps went like this: 1 (clean), 3, 4, 1 (sand), 3, 4, 1 (repair), 3 (right side this time), 4, 2, 5.


LIGHT OF THE WORLD

When Jesus spoke again to the people, he said, "I am the light of the world. Whoever follows me will never walk in darkness, but will have the light of life."   –John 8:12


This sign reminds us of how the 'Need to Adapt' characterized our project.
We originally planned to paint or apply letters to this beautiful plate glass window.
My son Max was an enthusiastic helper, and he applied his energy to polishing the glass. He even used a toothbrush and a scraper to clean all the tough-to-reach spots.

After I gave my approval of a Job Well Done, he leaped up and stepped out for the next task. To his horror, his foot caught the edge of the window and knocked it face-down on the floor with an ear-shattering crash.

Oh, the expression on his dear face! It's easy to forgive in the face of so much sorrow. I told him he saved all the kids in the elementary room the risk of breaking that window, because those glass shards were fearsome.

After a little more idea-browsing on Pinterest, I found some clever ideas involving chicken wire. I spray-painted the wire brown and Wendy and I stretched and stapled it across the back of the window frame.

It was a trust exercise. I stretched and held it. She strategically stapled it. In between my fingers.


My sister-in-law Angela Vanada was our behind-the-scenes Martha. She steadily worked away at all the odds-and-end tasks we gave her. I cut out a ragged swath of burlap from an old feed sack, and Angela stretched and glued the burlap to a rectangle of galvanized metal we found in a barn. 


I used the reliably quick waxed paper transfer method to apply the ink to the burlap, and we checked it off the list.

On a side note, our kids were the rough and ready test group for all the signs. They stopped in occasionally to check on the progress and we tested the readability of the signs. All the kids immediately told us this sign needed lights! My Mom hopped on Amazon, found a string of warm white LEDs (complete with a remote control), and we attached the lights on Hanging Day.

It was just the right touch.

DAYSPRING


Through the tender mercy of our God; whereby the dayspring from on high hath visited us. (KJV)
Because of the tender mercy of our God, by which the rising sun will come to us from heaven. (NIV)
Because of the tender mercy of our God, with which the Sunrise from on high will visit us. (NASB)
–Luke 1:78

This was the only sign we made with three different translations of the same name of God. We originally planned to hang only "Dayspring" on the bedsprings, but then worried the kids might think Dayspring referred to a mattress company. The end result presents all three translations.


We discovered a new technique on Pinterest: printing reverse letters on waxed paper and then transferring the printout to the sign surface. It worked beautifully, but we did learn a few things along the way.

Thoughts on this technique:
- We transferred waxed paper printouts to a variety of surfaces: glass, burlap, wood, painted wood, stone and metal
- The more porous the surface, the more ink it absorbs, so if you want a lighter transfer, allow the waxed paper printout to air dry slightly before transferring
- For non-porous surfaces, such as glass and painted wood, the air-drying step is essential; without allowing the ink to slightly "set" on the waxed paper, the transfer smudges and develops smudges and bubbles
- Brushing polyurethane coating over the ink wasn't a good idea - it smeared
- Spraying the transfer with a clear coat is highly recommended, especially if you don't want your 5-year-old to smudge the transfer (the smudge occurred nearly a week after the transfer, so I learned my lesson quickly).

THE ONE


To the One who gives victory to kings, who delivers his servant David from the deadly sword.  –Palm 144:10


This sign presents junk lettering on a completely different scale. HUGE! It was thrilling to see this hanging on the wall in the church, because we never had the space or the height to see it completely laid out.

It all started with the "O".  Robert, Chewie's husband, became involved in this project through his generosity, although I don't think he ever fully pictured what we were creating. He kept telling us that he had a metal wagon wheel rim that he was "sure we could use".  We spent around 30 minutes digging through frozen ground, moving boulders, metal tractor parts, and untangling the rim from rusty cable before we finally freed the sucker.

Here it is, in all it's glory. Incidentally, this is right before Wendy rolled it down the hill to the basement door (skipping merrily along).

Robert also donated some of his beautifully-maintained (and super-sharp) wood saws for the "N". I think I heard a small moan escape from one of the guys on the hanging crew when he drilled into the saw to attach it to the wall.


Actually, he pre-drilled the saws before hanging. He was probably moaning because his muscles were getting sore from all this work on his day off.


This "THE" was literally the very last piece we created for the room. Wendy wired it to the metal "tray", then we were officially DONE!

Except for Messiah, which I added unscripted.
Er, and the other two signs I'm still planning to add to the room (Mike actually winces when he hears this, so don't mention it to him).


CARPENTER


"Isn't this the carpenter? Isn't this Mary's son and the brother of James, Joseph, Judas and Simon? Aren't his sisters here wth us?" And they took offense at him.   –Mark 6:2-3


Carpenter was our first "junk lettering" sign, and it was a lot of fun to put together. Sam helped me lay out an impressive array of the tools and "junk" we were given. This was one of three tables of junk, not including the items too heavy to place on a table.


We were incredibly pleased with our first junk sign.
Then Mike burst our bubble by telling us we couldn't hang rusty metal tools on rotten siding boards.
Killjoy.
He kindly offered to take on the task of reinforcing the sign with purchased (new) wood.

So we spent the next three weeks kicking Carpenter around on the floor while we moved on to other signs. Thankfully, Mike reinforced the sign, we attached the tools with a combination of industrial glue (E6000 is our BFF) and by drilling holes in the sign and wiring the tools to the boards.


The finished result is definitely one of my favorites, but it also presented quite a challenge to the talented crew on hanging day.